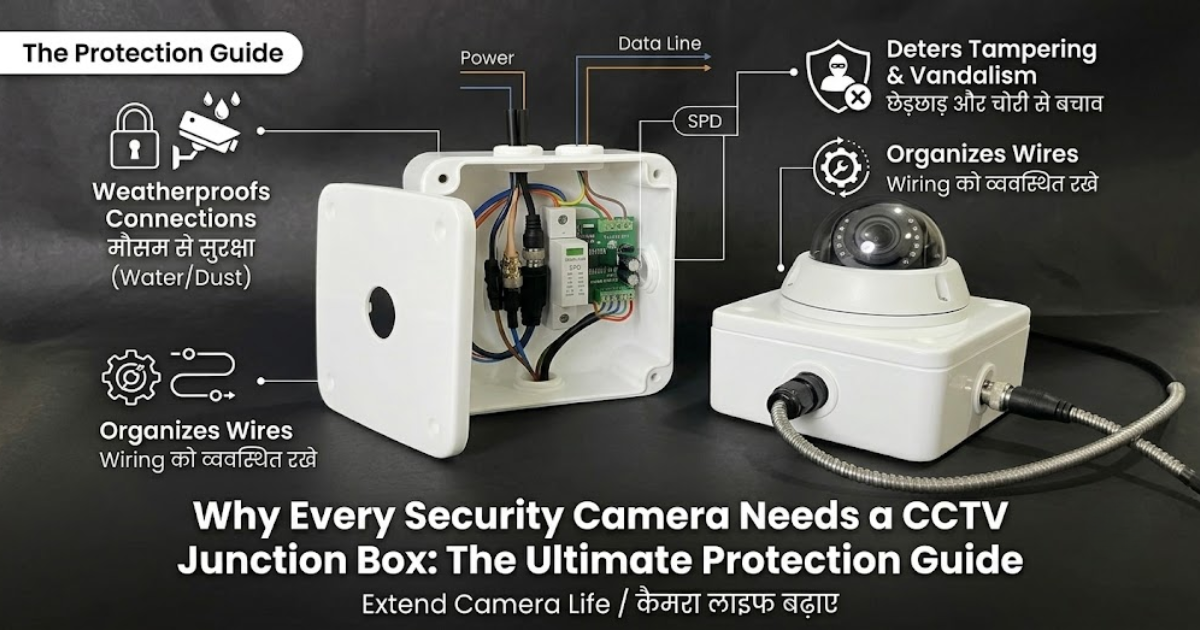
When planning a security system for a residential property, commercial complex, or industrial facility, the majority of the budget and research goes into selecting the high-resolution cameras, network video recorders (NVRs/DVRs), and premium storage drives. However, a massive vulnerability is often left completely unaddressed: the exposed wiring connections at the mounting point.In professional surveillance installations, a CCTV junction box is not an optional accessory—it is a critical hardware component. Installing outdoor or indoor security cameras without a proper enclosure leaves sensitive electronic joints vulnerable to environmental degradation, physical tampering, and systemic failures.
This ultimate protection guide covers everything you need to know about why a CCTV junction box is mandatory, how it protects your surveillance investment, and how to select the right one for your specific architectural and environmental setup.
What Exactly is a CCTV Junction Box?
A CCTV junction box, frequently referred to in the security industry as a deep base mount, camera base box, or weatherproof terminal enclosure, is a specialized protective housing designed to be mounted directly behind or beneath a security camera.
The primary engineering purpose of this box is to provide a sealed, isolated chamber to contain the critical connections where the camera’s pigtail cable hooks into the main run of infrastructure cabling (such as Cat6 ethernet cables for IP cameras or coaxial/power cables for analog HD systems).
Anatomy of a Standard Camera Mounting Box
- The Top Cover/Faceplate: This is where the base of the dome or bullet camera is physically screwed down. It often features pre-drilled, universal hole patterns matching major camera manufacturers.
- The Main Enclosure Body: A hollow cavity designed with sufficient volumetric space to house bulk connectors, passive baluns, PoE splitters, and excess cable slack without bending the wires beyond their minimum bend radius.
- Conduit Entry Points (Knockouts): Threaded openings or punch-out points located on the back and sides of the box, allowing cables to enter through protective conduits (PVC or flexible metal pipes) cleanly.
- Gaskets and Seals: High-density rubber or silicone seals lined along the inner rim of the cover and around entry points to block ingress of external elements.
5 Critical Reasons Your Surveillance System Requires a Junction Box
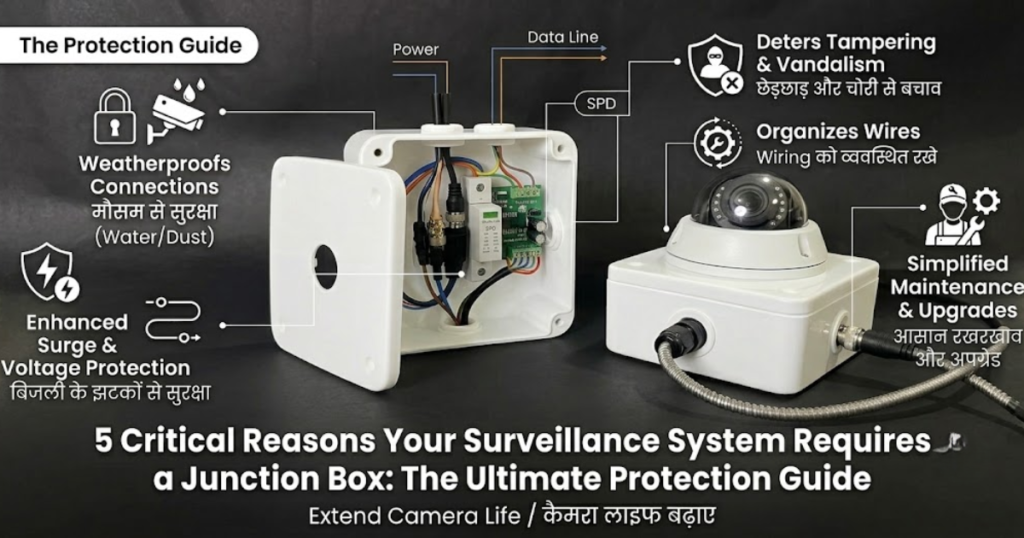
To understand the absolute necessity of these enclosures, we must look at the specific vulnerabilities an open-air installation faces over time. Below is an in-depth breakdown of the primary protection vectors offered by a dedicated junction box.
1. Ingress Protection Against Severe Weather (Water, Dust, and Moisture)
Outdoor surveillance cameras are subjected to extreme atmospheric cycles. In regions experiencing heavy monsoon downpours, freezing winters, or high-humidity coastal winds, bare wire joints degrade rapidly.
- The Risk of Oxidization: When BNC connectors, DC power pins, or RJ45 modular jacks are exposed to air and moisture, they undergo copper oxidization. This creates a high-resistance layer across the pin contacts, leading to progressive image degradation, rolling lines, or complete video loss.
- The Danger of Capillary Action: Water drops tracking along an exposed cable can actually be drawn inside the connector shell via capillary action. Once water compromises the jacket, it can travel down the wire strands directly into the camera’s internal circuit board, short-circuiting the sensor permanently.
- The Solution: An IP65 or IP66 rated CCTV junction box acts as a structural umbrella. By sealing the terminations in a localized dry environment, it completely removes atmospheric moisture from the transmission equation.
2. Eliminating Physical Tampering and Vandalism
The primary objective of installing a security network is to deter and log criminal activity. However, if an intruder can easily disable the camera before entering its primary field of view, the system fails fundamentally.
- The Vulnerability of Exposed Loops: Without a deep base box, installers typically push excess cable back into a roughly drilled hole in the wall or leave a loop of wire hanging adjacent to the camera bracket. An intruder can easily cut these visible wires using simple hand tools, or use a pole to yank the cables loose, blinding the security operations center instantly.
- The Secure Shield Concept: When utilizing a heavy-duty box, all interconnecting wires run directly out of the camera base straight into the sealed enclosure. No wires are exposed to the naked eye. If the infrastructure cable runs through a solid conduit directly into the back of the junction box, there is literally zero accessible wire for a vandal to grip, cut, or compromise.
3. Electrical Insulation and Short-Circuit Prevention
Modern IP surveillance rely heavily on Power over Ethernet (PoE), carrying up to 48V–57V of direct current (DC) along network pairs. Analog systems use separate 12V or 24V power distribution lines.
- When bare power connections come into contact with wet brickwork, conductive concrete walls, or metal beams, it creates an unintended grounding path.
- This grounding loop can introduce massive video noise (ground loop hum bars) into the monitoring stream.
- In worst-case scenarios during electrical storms, exposed outdoor connections can attract localized static discharge, sending high-voltage surges directly back into the multi-channel NVR or expensive network switches, blowing out the entire rack.
- A non-conductive uPVC junction box or a properly grounded aluminum die-cast box keeps electrical potentials isolated, ensuring current stays within the intended insulated pathways.
4. Advanced Structural Cable Management
Proper engineering dictates that data and power lines must never be subjected to physical stress or tight bends.
[Main Infrastructure Cable via Conduit]
│
[Camera Base & Pigtail]
- Preserving the Bend Radius: Forcing stiff Cat6 outdoor cables to make sharp, 90-degree turns inside a shallow wall cavity can kink the copper cores, causing structural return loss and failing data packets.
- Managing the Pigtail: Every professional camera comes with a permanent 1-to-2-foot “pigtail” assembly containing resetting switches, power jacks, and video outputs. A junction box provides the necessary volumetric space (cm^3) to loop this excess cable comfortably without pinching, ensuring high-speed data transmission remains clean and unthrottled.
5. Architectural Cleanliness and Brand Image
For commercial offices, luxury residences, retail outlets, and hotel lobbies, aesthetics matter. A cluster of black electrical tape, dangling wires, and plastic zip-ties outside a storefront looks highly unprofessional and signals a poorly maintained facility.
A dedicated camera box ensures the camera looks integrated into the building’s architecture. It provides a flush, seamless transition from structural wall to security equipment, projecting an aura of institutional, highly planned security that deters criminals by its mere appearance.
Comprehensive Structural Material Comparison
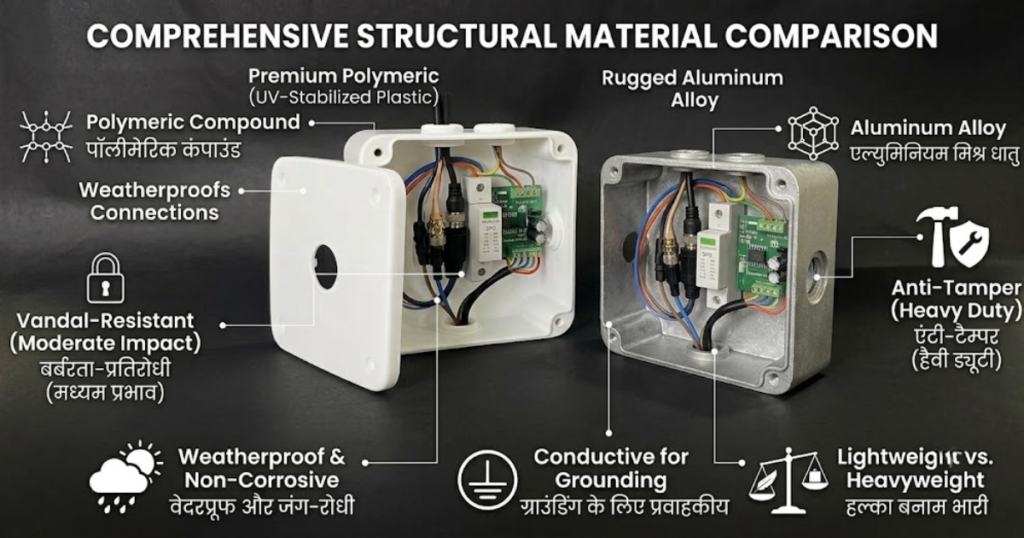
Choosing the wrong material can lead to early cracking, degradation under ultraviolet (UV) radiation, or structural failure. The two main industry-standard materials are analyzed in detail below:
| Technical Feature | Engineering-Grade Polycarbonate / uPVC | Aluminum Die-Cast Alloys |
| Corrosion Resistance | 100% immune to rust, salt-spray, and chemical atmospheric corrosion. Excellent for coastal zones. | Excellent if powder-coated; can corrode over extended decades if bare metal is exposed to acidic rain. |
| Impact Resistance | Moderate. Can flex under minor impacts but might crack under deliberate, heavy hammer blows. | High/Vandal-Proof. Extremely solid structure capable of withstanding heavy mechanical blunt force. |
| UV Stabilization | Requires specific UV-inhibitor additives during manufacturing to prevent yellowing/brittleness. | Naturally immune to ultraviolet solar degradation. Does not warp under intense direct sunlight. |
| Electrical Grounding | Non-conductive material. Requires no independent grounding wire to protect against wall shorts. | Conductive. Must be properly integrated into the building’s grounding loop for absolute surge safety. |
| Installation Weight | Extremely lightweight; easy to hold and mount on high ladders or lightweight drop-ceilings. | Heavy-duty. Requires secure anchoring bolts into solid brick, concrete, or structural steel I-beams. |
| Cost Matrix | Cost-effective. Ideal for large multi-camera residential or light-commercial rollouts. | Premium pricing. Reserved for industrial sites, public infrastructure, and high-risk commercial zones. |
Step-by-Step Professional Installation Workflow
To achieve a true weatherproof and tamper-resistant setup, follow this step-by-step methodology used by elite certified security integrators.
Phase 1: Pre-Installation Inspection & Punching
- Verify the camera base alignment with the junction box faceplate. Choose the correct pre-threaded holes and insert matching silicone mounting bushings.
- Determine the cable entry path. If the wire comes from inside the wall, use the rear knockout. If running surface-mounted conduit along the wall, punch out the corresponding side knockout.
Phase 2: Secure Mounting to Structural Surface
- Hold the base of the junction box against the wall surface. Mark the anchoring points using a leveling tool.
- Drill holes into the brick/concrete using an appropriate masonry bit. Insert heavy-duty nylon wall plugs.
- Apply a thin bead of outdoor-grade silicone sealant around the rear perimeter of the box where it meets the uneven wall. This prevents rainwater from seeping behind the box and entering the structural wall cavity.
- Drive the stainless-steel screws securely home, ensuring the box is completely flush and immobile.
Phase 3: Cable Routing and Mechanical Termination
- Pull the primary infrastructure cable through the conduit pipe directly into the box via a waterproof compression gland (PG9 or PG11 connector).
- Tighten the gland until the rubber collar grips the cable jacket firmly, creating a vacuum-tight seal against crawling insects and moisture.
- Terminate your connections neatly (crimp the RJ45 jack or twist the BNC lock). Apply dielectric grease over the exposed metal contact points to stop micro-moisture formation.
Phase 4: Enclosure Sealing and Camera Alignment
- Carefully loop the excess cable slack along the outer boundary wall of the internal box cavity. Avoid pressing the wires tightly against sharp internal screws.
- Mount the camera housing onto the box cover plate using the provided machine screws.
- Check that the rubber perimeter gasket of the box cover is seated flawlessly in its track.
- Secure the faceplate screws in an alternating diagonal pattern (like tightening car wheel lug nuts) to ensure even mechanical pressure across the entire environmental seal.
Summary Checklist for Choosing the Perfect Box
Before placing a wholesale order for your security project, ensure your chosen hardware meets this standard procurement checklist:
- [ ] Correct IP Rating: Verified IP65 (minimum for sheltered outdoors) or IP66/67 (completely exposed to direct monsoons).
- [ ] UV Protection: Built-in ultraviolet stability certification to avoid plastic breakdown in hot tropical summers.
- [ ] Dimensional Volume Match: Ample cubic volume inside the box to store bulk video baluns, POE splitters, and thick outdoor cable runs without pinning.
- [ ] Conduit Compatibility: Built-in threads matching standard 20mm or 25mm PVC conduit pipes perfectly.
- [ ] Color-Matched Aesthetics: Selecting matching finishes (pure white, grey, or dark charcoal) to match the corresponding camera chassis color seamlessly.
Comprehensive Frequently Asked Questions (FAQ)
Q1: Can I install outdoor security cameras without using a junction box if I wrap the wires tightly in professional electrical tape?
Answer: Absolutely not recommended. Electrical insulation tape is designed for dry, internal electrical environments. Over time, exposure to changing solar heat and rain causes the adhesive on electrical tape to melt, unwrap, and become brittle. Once the adhesive degrades, rainwater easily penetrates the microscopic gaps, causing connection corrosion, short circuits, or erratic signal drops. A physical weather-proof box is the only permanent solution.
Q2: What is the specific operational difference between an IP65, IP66, and IP67 rated junction box?
Answer: These ratings represent the international Ingress Protection standards:
- IP65: Fully dust-tight and protected against low-pressure water streams from any angle. Perfect for corridors, under-eaves, balconies, and semi-sheltered areas.
- IP66: Fully dust-tight and designed to handle high-pressure heavy water jets or direct, torrential downpours. Essential for cameras mounted on open poles, rooftops, and boundary walls facing intense seasonal weather.
- IP67: Fully dust-tight and capable of surviving temporary total submersion in water up to 1 meter for 30 minutes. Reserved for specialized marine settings or trenches prone to temporary flooding.
Q3: Are generic plastic junction boxes from local hardware shops just as good as brand-specific camera deep bases?
Answer: Generic electrical boxes can function as basic weather enclosures, but they lack the structural design advantages of specialized camera deep bases. Camera-specific boxes feature precisely engineered, pre-threaded hole configurations that allow you to bolt the camera directly onto the plate without drilling custom paths. This maintains the certified IP rating of the seal, whereas modifications to generic boxes often create tiny entry paths for water and bugs.
Q4: My camera is mounted indoors under a clean ceiling. Do I still need a junction box?
Answer: Indoors, weatherproofing is not a priority, but a junction box is still highly beneficial for structural stability, maintenance, and cable safety. It allows installers to mount cameras cleanly onto hard concrete ceilings where hollow wall cavities are unavailable to hide the wires. It also streamlines future system upgrades, allowing technicians to replace cameras easily without ripping apart the primary drywall or ceiling infrastructure.
Q5: How do I prevent insects, like ants or spiders, from building nests inside an outdoor junction box?
Answer: Insects love dark, warm enclosures and often squeeze through tiny unsealed conduit entry pathways. To prevent this, always use tightly fitted rubber grommets or screw-in plastic compression glands on every open knockout hole. This completely blocks all internal pest highways.
Q6: Can a metal junction box affect the wireless Wi-Fi signal of a smart security camera?
Answer: Yes, it can. If you are using a Wi-Fi-enabled security camera that features an internal antenna or runs its wireless module near the base, mounting it directly onto a large, solid aluminum metal junction box can cause wireless signal attenuation (acting like a partial Faraday shield).